
Friday, October 9, 2015
Friday, June 19, 2015
Project Resurrection "The (W)rapper

You see, I have a friend Josh, who has a business making signs but is really really making a go at vinyl wrapping cars. He has put in the time to be trained and certified by companies the likes of 3M and Avery Dennison, and has had several fantastic projects that you can see driving around as well as a multitude of branded vehicles around town and elswhere as he travels to do this also. His business is called Art City Wraps And when you walk in, there is a definite vibe of coolness. Being an art major this is a natural fit for him. The 337 is a perfect example of what a creator does. The before and after of this car are mind numbing. This has been by far the most effective and outstanding modification I've done to this car yet. Everything else was in the nether regions, rarely seen but made it worth doing this.
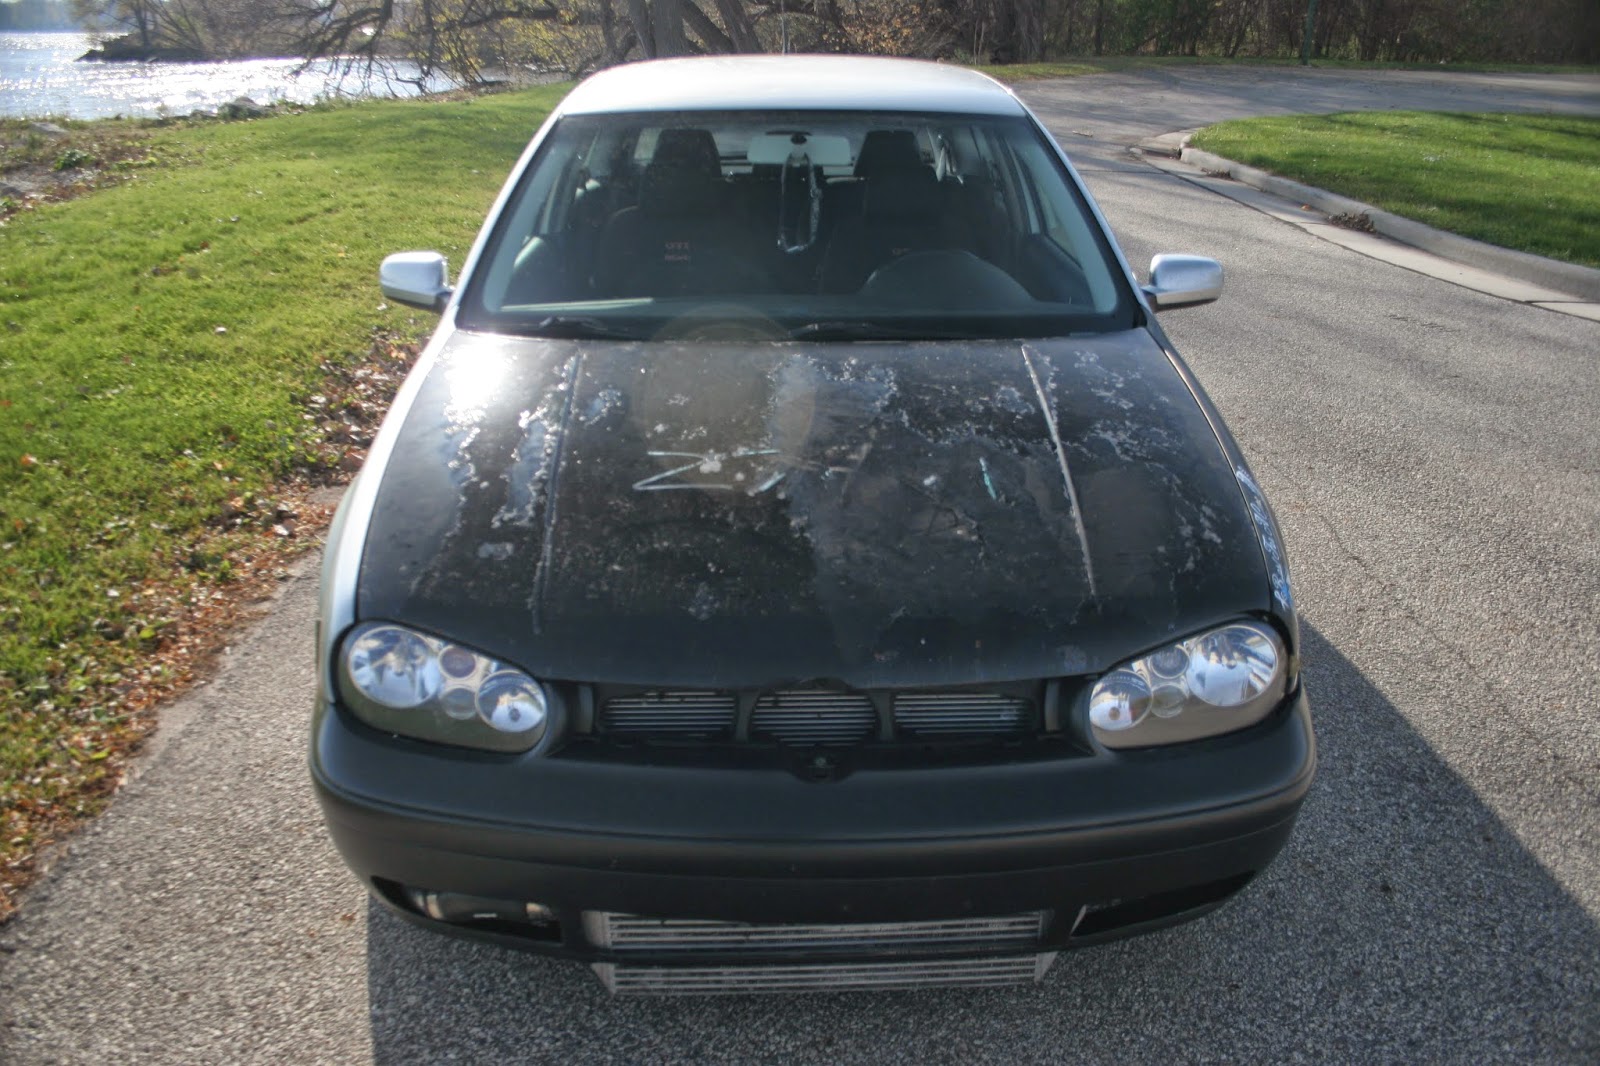
The top picture is what it looked like in pure hoopty status on my way to the vinyl shop on day 1 of the install. Haha, this car was rough. Here's a couple more "pre show" photos.....

 |
| We had wrapped the driver fender the night before to see how the vinyl looked against the paint...... |
Although just a small portion of a vehicle I was impressed enough to decide to go full boat on another one. This was decided by me as I looked at the photos of the car before I even purchased it. I knew what this car was going to look like before money changed hands!
So the process of wrapping seems pretty straight forward right? Just throw a big sticker on the car? Easy. I cannot name one person who I saw make that decision and statement on some online forum that wasn't back recommending having a professional do it after trying it themselves.
Ultimately it is a craft. It is details, it is a study of patience, and a huge practice of applied techniques both learned and discovered while doing it. Josh is a prime example of this. Since the camo wrap on my white car, he had a whole new bag of tricks when he did this one.
I'm not going to give away his techniques or trade, I am just going to post a bunch of photos of this wrap and let those speak for me. 85% of people prefer photos anyway (100% of statistics are made up on the spot).

 |
| This process really is a study in patience and detail. The corners of my car really do look like paint. |
 |
| This is where I really started to get excited..... |

 |
| Everybody be like "why did you wrap a silver car flat silver?" I say, "because I can!" look at how close that is though. Dang. BTW, 337's only came in silver which was a huge factor in my decision on color |
 |
| This is where it starts getting hairy. The edges and corners, details details details...... |
 |
| All the tedious waiting and trimming and anticipation are totally worth it when you get a real look at what is coming though. |


 |
| I'll say it again, and you say it with me. Details..... |

 |
| Whoooooooodaaaaaang! Here we go! |
 |
| Speaking of details, I did take the liberty of doing some little stuff through this, For instance, painting the intercooler black so it doesn't stand out so much........ |
So another wrap. Awesome stuff. This did not take one day either. This was done over the course of several days, and many hours each of them. Why wrap? Well, if need be, the car is not totally disabled. I drove it home and back to the shop through this process. If I had painted it, to do it right the windows would have been out, panels off, etc. Maybe not an ideal situation to be driving it through this either, but entirely possible. And the cost. Dang, easilly a third the cost of a good paint job, totally reversible and very durable. If it scratches or is damaged, redo a panel. Maybe a hundred bucks? Repaint something for that! How about some after photos?
I've of course had the car out to some places and drive it every day, but remember where we started?


I have many big thanks to hand out for this project to get as far as it has. Of course Josh at Art City Wraps, My friend and local hero Kris of Beckett's and Ski's fame for Doing a sweet job powdercoating the wheels (a very multi talented person, spend a minute talking to him and you will realize why he's rad) My friends at Further Performance in MPLS for assistance with some parts, and endless advice when doing different things on this (see them at DIV, they have a pretty kickass booth setup every year and can do anything you need done with a vehicle. Raddest group of people with tools ever) And many many others for lending hands when I needed it. This car is far from done, but chapter one is in the books, some touch ups here and there and on to chapter 2 ;).
I used as many local resources as I could with this. And the best parts of this thus far were homegrown in Oshkosh. I like it here.......
Till next time I can't sleep.........
Sunday, May 24, 2015
#lifestylechoices

Dubs in the valley made it's first appearance in 2007. 2008 was not bad, probably a favorite for many who were there and still come. In 2009 the venue had changed to our current home, and we were starting to pick up some steam as the word was getting out about our little midwest party.
Also in 2009 (I think, old age, and so many memories really blend into one big blurb sometimes) is when I started seeing all kinds of t-shirts that had some pretty great stuff on them. I'm pretty sure it was at Scooters that I saw my first "Team Eurotrash" star design on a shirt as well as several other that caught my eye.

A short period of time after Scooters that year I got a somewhat anonymous seeming message asking how much it would be to set up a booth and sell some shirts. After the equivalent of internet handshakes went around and I put some thought into it as this was a new thing for me. Somebody contacting me asking to come aboard. Interesting. Not being a "big" show, a small one by all rights I couldn't fathom charging much money, add to the fact this guy said they were coming from somewhere way down south. So more internet equivalent of handshakes went around and Team Eurotrash was signed on for their first DIV. Little did I know what that would lead to for me personally and for the future of the show. Although I already was pretty dedicated to this world, Over the years I have received lesson after lesson from these guys about "dedication" Who in their right mind pays money to drive 400ish miles, to little known show to sell shirts? These guys, and this is precisely why they are getting some interweb here.
If you ask Brad and Dinah seperate from each other the story may differ from each other but it is certain that Team Eurotrash was started in the mid 2000s by Dinah.

Our entire enthusiast world is kept in rotation by people with an idea and a goal. Dinah is a prime example. Thanks for shooting for the stars D and having a will to contribute to the world that you probably saw more in than most. Because any undertaking like this is a struggle..
The early history is a little vague for me, as many of the times it has come up was very late (or very early depending on if you are an optimist or a pessimist) after many malted beverages have given their lives for our enjoyment. But at some point not to far into this Brad was introduced to TET and from what I can tell became a driving force in the marketing and distribution.
Brad isn't a fan of being internet mugged so I'll just put this here:
 |
| First generation of Brads latest creation, more on this farther down. |


 |
| this one is turning into a classic. If you haven't seen it you live under a rock or don't go to VW shows. Either one is fair, no harm done, just the facts..... |

I can't count how many more there are that I either don't have an image of or have myself to make an image. All I know is that when I am in their booth at carshows, I am slinging t shirts like water bottles in the desert. Their facebook page lights up with likes whenever something new or an update from wherever they are is posted. find them here:Team Eurotrash Facebook
They also have an online store where you can get some pretty badass swag here:The store. Go buy something......
And lets not forget about instagram:Pictures from a Eurotrash lifestyle
These guys exemplify everything I preach about when I talk about "the lifestyle". Over the years I have had more fun, met more people, seen all kinds of stuff, made so many friends, man so many friends, had more laughs, killed an uncountable number of malted soldiers, and learned the true meaning of dedication from these guys. Sorry for the gushing, all of that was on a personal level. These folks have become close personal friends over the years. As far as Dubs In the Valley goes, it has been a welcome partnership for many years. If you aren't familiar with Eurotrash, maybe you should get acquainted. They know what's up and aren't afraid to prove it.
Oh yeah, the Porsche. One word:Holymotherofgodlookatthatthing......

So many relationships like the one described have been born from this path I travel. Look for more here because these story's will be an introduction to many of the people you see at events, and an insight as to why they are a good resource for you as a VW enthusiast.
This btw is from their "about us" section on the Big Cartel page:
Eurotrash was started as an alternative to what the scene had to offer. Sick of the drama and lack of enthusiasm for european cars, eurotrash was born. It starts with a few friends and has grown into what it is today. We have seen many fads come and go through out the years but our philosophy has never changed. Build fast low cars, drive hard, have fun and run over those that stand in our way.
Sunday, April 26, 2015


Saturday, March 14, 2015
Project Resurrection: "Movement"
Have you ever opened the hood on a car and thought "What the hell is all that crap?" I remember thinking this many times early on in my early years of dealing with automobiles. The seemingly tangled mess of hoses, wires and mystery items that only fufill the purpose of blocking your hands when you need to access something as well as performing the magic that prevents your check engine light from joining you in your travels in the early stages of your cars life, and transforms into an ugly demon hell bent on keeping it on in the later stages.
My engine in particular had some of this stuff eliminated before I got it but was still in need of much more help. Some of the stuff in there was questionable on initial inspection, and there was still a maze of brittle plastic breather hoses that had been along for the ride since the car had rolled out of the factory. It needed to go. If there is anything that drives me nuts, it's an engine that has a mess of crappy crap all over the place (which is a bit odd, because I am generally not a "details" guy) random looking hoses and just crap in general.
So after reading all the threads on the mystical and all knowing internet, I assembled everything I would need to delete all of these things and after work one Friday I fired up my garage heater and pulled the 337 in.
Always with other issues to address and just some fun stuff to add I got started several hours later (with the temps outside at negative stinking cold, it took about 3 hours for my heater to get the garage anywhere near sort of comfortable. Thanks Wisconsin).
Before I dug into the main task, like I said I had a couple other odds and ends to address. Fist one was an upgraded engine mount known as the "dogbone". See the photo and the name will make sense. One great effect changing this mount to an upgraded unit is it will help keep things sound and planted in the event of wheelspin.
With that out of the way my next piece was a turbo inlet pipe ie: how the engine gets it's air. I am not going to drivel here long about how a turbo works, if you are unsure see here for a full tutorial:How a turbo works.
Ultimately the working theory is the better the engine can breathe, the better it will perform. So to help it breathe better the first thing to do would be how it takes in air. Start at the beginning and work your way to the end.
So one of my purposes under the car was to get a good shot at the lower end of the inlet pipe from the bottom of the car to release said pipe from the turbo. Of course as I do these things I am generally under my car making crude noises and mutterings mixed with barely intelligible curses every so often as I figure out how to get to something. As with most projects there is far more dis-assembly to access one thing than you would anticipate so instead of taking photos (that process is forgotten and out the window by the time I figure out what comes off next one reason I will never be able to publish an accurate and thorough "how to" article) I move forward and realize far to late for any in progress pics and move on to this:
As you can probably see, even if you have no idea what you are looking at, the pipe on the left would probably allow far more volume of anything through than the one on the right. On the right is stock equipment from VW, it's worked for years, but doesn't mean it can't be improved upon. Note on the stock piece how at the bottom it pancakes and has to impede airflow at least a bit and the replacement holds the nice round pipe shape all the way down. The one on the left is from APR and is absolutely an upgrade from factory. This particular pipe is actually for a different application than my exact engine so I got an ok deal on it, and with the ports in slightly different spots than original it actually worked a little better for me as I was putting everything back together I relocated some things for a little tidier finish.
So now the meat and potatoes of this. The main purpose of this project is to get rid of all the old, brittle evap system and secondary air injection system hoses, as well as rebuild the meddled with and substandard crankcase ventilation to a system that doesn't fill my intake tract with oil causing a burning oil smell from start up on due to a faulty pcv valve. Ultimately they are emissions related and not absolutely needed for proper engine operation.
I did miss the 90* and "T" pcv fittings as of course I forgot to take photos as I was doing this. Surprising.
This is without a doubt a "some disassembly required" project. As always some photos I'm missing are the removed intake manifold and a couple "disassembled" photos.
So after alot of removing, and less reassembling, this was my pile of stuff on the floor.
Now, as this is my daily driver, I needed to get it back on the road asap. Hence I did not take everything off and clean, paint or polish. Not a big deal to me, some will chastise me for this but hey, I did do some major cleaning in this bay with good noticeable results.


Next steps in the engine bay are: find an intercooler set up that the piping is less obvious. I am not into that big shiny pipe traveling through the bay. I would much rather sticker bomb it than have that much brightwork. And maybe I'll take the components off and run them through the hot tank. Not a priority by any stretch. This works, it's not a show car. More for purpose than beauty.
Now the outside, well, that's a different story. Somewhere in the area of a week this will look like a completely different car......
So in the end, I get a cel about every 200ish miles for an improper flow in the secondary air injection, which I clear and it goes away for a couple hundred miles. Not a big deal considering this is was a beginning point for this car:
And this is current:
 I'm ok with an infrequent check engine light......
 |
| This is an AWP code 1.8T engine (not mine) still carrying most of the factory equipment, looks tidy? No. Go ahead, put your hand in there. |
 |
| Same view as the last except my starting point. Like I said, a bit less but still a mess. |
Always with other issues to address and just some fun stuff to add I got started several hours later (with the temps outside at negative stinking cold, it took about 3 hours for my heater to get the garage anywhere near sort of comfortable. Thanks Wisconsin).
Before I dug into the main task, like I said I had a couple other odds and ends to address. Fist one was an upgraded engine mount known as the "dogbone". See the photo and the name will make sense. One great effect changing this mount to an upgraded unit is it will help keep things sound and planted in the event of wheelspin.
 |
| The new one installed with the old one held up. With the old units bushings all worn and floppy, the switch to another one from VF with poly bushings is a strong upgrade in itself for this car. |
Ultimately the working theory is the better the engine can breathe, the better it will perform. So to help it breathe better the first thing to do would be how it takes in air. Start at the beginning and work your way to the end.
So one of my purposes under the car was to get a good shot at the lower end of the inlet pipe from the bottom of the car to release said pipe from the turbo. Of course as I do these things I am generally under my car making crude noises and mutterings mixed with barely intelligible curses every so often as I figure out how to get to something. As with most projects there is far more dis-assembly to access one thing than you would anticipate so instead of taking photos (that process is forgotten and out the window by the time I figure out what comes off next one reason I will never be able to publish an accurate and thorough "how to" article) I move forward and realize far to late for any in progress pics and move on to this:
 |
| The new (left) and the old (right) |
So now the meat and potatoes of this. The main purpose of this project is to get rid of all the old, brittle evap system and secondary air injection system hoses, as well as rebuild the meddled with and substandard crankcase ventilation to a system that doesn't fill my intake tract with oil causing a burning oil smell from start up on due to a faulty pcv valve. Ultimately they are emissions related and not absolutely needed for proper engine operation.
 |
| These plugs each get a 1watt 330 ohm resistor to plug into the harness to "fool" the car into fueling correctly without the emissions stuff that was plugged in those spots. |
 |
| Really. These items, a couple resistors to go in those plugs (not pictured) and a bunch of hose clamps. And time, and maybe about a c-level technician skillset. That's it. |
This is without a doubt a "some disassembly required" project. As always some photos I'm missing are the removed intake manifold and a couple "disassembled" photos.
 |
| I managed to snap this as I was starting to take everything apart. This barely even scratches the surface of this process. |
 |
| This is the "deleted" pile. All kinds of stuff taken out. |
|
| Access to the engine is far easier now, and the engine bay doesn't look like a hose factory barfed in there. I also installed a set of silicone coolant hoses while I was in there this time too. |
Now the outside, well, that's a different story. Somewhere in the area of a week this will look like a completely different car......
 |
| Wonder what this means? |
 |
| stock |
|
| my starting point. |
And this is current:
Subscribe to:
Posts (Atom)